
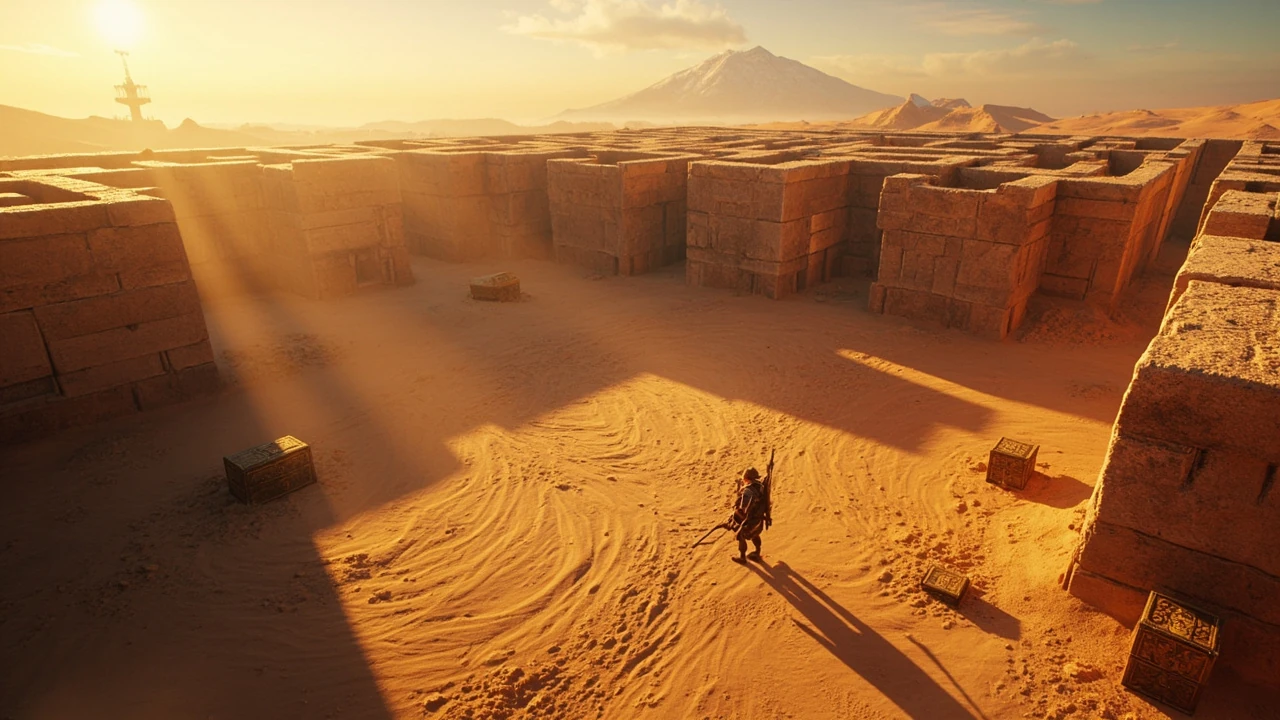
South Lomei Labyrinth in Breath of the Wild: a level design breakdown
South Lomei Labyrinth sits in the eastern Gerudo Wasteland between Mount Granajh and the East Barrens, framed by Daval Peak to the north. The IGN wiki on Breath of the Wild confirms that this structure is the entry point for the shrine quest that exposes the hidden Dila Maag Shrine, and it describes two primary approaches: a ground path through Champion’s Gate next to the East Barrens, or a high-mountain descent from the Wasteland Tower and Spectacle Rock. That single sentence from the official quest documentation is enough to tell a level designer what the team at Nintendo EPD was actually trying to teach the player: orientation, route planning, and risk assessment, all compressed into one large open-world puzzle box.
What makes South Lomei Labyrinth a useful case study for game development is that it borrows mechanics from classic maze dungeons and recombines them with Breath of the Wild’s core systems. Climbing, paragliding, stamina management, weather, enemy patrols, and vertical movement are not extras bolted onto a maze. They are the maze. The result is a system-driven puzzle that scales gracefully with player progression, yet still rewards careful play at the moment of entry. This article walks through the design vocabulary of the labyrinth, contrasts it with the two Lomei siblings, and breaks down the systems the developers used to keep exploration fair.
Why a large maze still works in an open-world game
Mazes in games usually fail for one of two reasons. Either the path is visually confusing without being mechanically interesting, or the maze is interesting but the surrounding systems let the player bypass it. The Lomei structures in Breath of the Wild solve both problems by leaning on physics, weather, and stamina as gates, and by making the entire region a navigation problem rather than a corridor.
- Verticality: the walls are tall enough to make the paraglider a meaningful tool and short enough that an attentive player can read the layout from a high vantage point.
- Atmospheric contrast: the labyrinth’s interior is cool and shaded, so torches and warm-toned loot stand out from the desert palette outside.
- Soft gating: there is no lock, but the same skills the player uses everywhere else in Hyrule are rewarded in this confined space.
- Three-act structure: arrival, exploration, and shrine discovery, separated by the quest trigger and a hidden final chamber.
For a developer, the takeaway is that a maze is not a map. It is a decision space. South Lomei Labyrinth exposes the player’s habits: do they sprint, do they climb, do they cook, do they read the terrain, and do they plan before committing stamina. Each of those choices is a small experiment the player runs on themselves, and the environment keeps the score.
Where South Lomei Labyrinth sits in the Lomei set
Breath of the Wild ships with three Lomei structures, and their distribution across the map is deliberate. The two surface labyrinths bookend the eastern and western halves of the map, while the third sits in the Depths as a late-game discovery. Comparing them shows how the same template can be tuned for different difficulty bands without rewriting any rules.
| Labyrinth | Region | Biome | Quest hook | Revealed shrine | Approximate skill band |
|---|---|---|---|---|---|
| South Lomei Labyrinth | Gerudo Wasteland | Hot desert with cool interior | Shrine quest triggered on entry | Dila Maag Shrine | Mid-game, after one or more Divine Beasts |
| North Lomei Labyrinth | Hebra region | Snowfield with cold interior | Shrine quest triggered on entry | Ketoh Wawai Shrine | Mid-to-late, requires cold resistance |
| Lomei Labyrinth Island | Central Akkala Sea coast | Coastal, surrounded by deep water | Surface and depths versions | Tu Ka’loh Shrine (surface) | Late-game, often paired with Depths access |
The reason to keep these three structures symmetric is that the player learns one rule set and is then asked to apply it under different pressure conditions. Hot desert, snow, and coastal storms all stress the same core mechanics in different ways. The shrines are the reward layer; the labyrinth geometry is the lesson.
Reading the geometry before you enter
The most efficient first step with South Lomei Labyrinth is the one most players skip: stop on a high ridge and read the structure. The walls form a nested pattern, and from a tower or a mountain shoulder the player can see how the inner ring is offset from the outer ring. This is the same design lesson behind good level art in any engine. The geometry should reward the player for paying attention before they commit.
Two vantage points are worth budgeting for. The Wasteland Tower to the northwest, which doubles as a Sheikah map unlock, and any high shoulder near Daval Peak to the north. From either, the player can see how the corridors are arranged and where the central chamber sits. That visual preview alone removes the most common cause of labyrinth frustration, which is wandering rather than navigating.
How traversal systems shape the experience
Breath of the Wild leans on a small set of traversal verbs. Climbing, gliding, sprinting, swimming, and burning are each useful inside the labyrinth, and each has a cost. The level designers use those costs to tune pacing without adding a single artificial gate.
| System | What it does in the maze | Player trade-off | Risk if overused |
|---|---|---|---|
| Climbing | Bypasses corridor walls when stamina is high | Spends stamina, exposes player on a wall | Slipping on rainy interior walls, falling damage |
| Paraglider | Skips sections from a high ridge | Drifts on wind, can overshoot or undershoot | Landing in a guarded courtyard or in a chokepoint |
| Sprinting | Speeds up long corridors | Drains stamina, prevents climbing in an emergency | Running into an enemy camp without escape resources |
| Fire and torches | Disarms or reveals certain interior hazards | Consumes weapon durability and arrow count | Setting the wrong surface and triggering an explosion |
The point of the table is not the columns. It is the relationship between columns. Each system is a dial. Designers raise one dial to enable a shortcut, lower another to make that shortcut cost something, and the player feels the tension as a single integrated challenge rather than a checklist.
Enemies, hazards, and the threat layer
South Lomei Labyrinth is not empty. The interior is inhabited by the same family of monsters that the player has been fighting across the Gerudo region, scaled to match the player’s progress. Their placement is not random. It follows the same three-act structure as the rest of the dungeon: perimeter guards, central reinforcements, and a final chamber that asks the player to commit before retreating.
- Perimeter patrols test whether the player is willing to skip or engage. Skipping is valid. That is the point.
- Mid-maze camps provide loot and a forced encounter if the player is loud. Quiet players can avoid them with paraglider or careful stamina use.
- Central guardian encounters are tuned to require resources, which is why the developer’s level loop also includes cooking, weapon selection, and armor choice before the player enters.
This is a classic open-world rhythm. A wide maze softens the resource pressure because the player can rotate in and out, and the monster density is set so the player is never forced into a fight they cannot afford to lose. Breath of the Wild gets a great deal of credit for its openness, but the credit mostly belongs to small calibration decisions like these.
The shrine quest: Dila Maag as the narrative reward
Completing the shrine quest in this labyrinth reveals Dila Maag Shrine, the small reward for a large piece of navigation. In the IGN guide, the quest is described as beginning when the player enters the South Lomei Labyrinth, and the structure of that description is the same structure the game teaches the player. The quest hook is the building, the building is the puzzle, and the shrine is the punctuation mark.
For a designer, this sequence is worth studying because it is a textbook case of layered motivation. A player who has no interest in shrines will still want to explore the maze, because the maze is interesting. A player who has no interest in the maze will still want the shrine, because shrines mean spirit orbs and heart containers or stamina. Either motivation, or both, produces the same behavior. That convergence is a sign of well-tuned level goals.
Loot, chests, and the design of small rewards
The For additional context, labyrinth hides a fixed number of chests, and the loot curve is the same as the rest of the game’s open-world pacing. Early chests are useful but not essential. Mid-maze chests introduce the player to gear they would otherwise miss. Final chests usually contain a cosmetic or a piece of armor that changes how the player relates to the rest of Hyrule. The point is that the chest distribution is part of the level design, not an afterthought.
- Outer ring chests reward players who enter confidently and clear the perimeter.
- Mid-maze chests are often hidden behind a skill check, such as a climb or a glide.
- Inner ring chests test the player’s patience, since they require solving the maze rather than the obstacle.
- Final chamber loot is the one the player is most likely to remember and to discuss with friends.
This ladder matches the skill ladder. Each chest asks for a different combination of traversal and combat, and the player who reaches the inner ring has usually demonstrated enough of the right habits that the final reward feels earned rather than gifted.
Path planning: two routes a player can plan around
There are two common routes into the labyrinth, and the choice between them is itself a design decision the player is making. The IGN wiki entry describes a ground route through Champion’s Gate near the East Barrens, north of the Keive Tala Shrine, and a high-mountain descent from the Wasteland Tower and Spectacle Rock that requires the player to paraglide down past Bokoblin snipers. Both are valid. Neither is optimal in all conditions.
| Route | Start point | Skill required | Best when | Risk |
|---|---|---|---|---|
| Champion’s Gate ground route | Keive Tala Shrine area, east side of the East Barrens | Basic traversal and stamina | Mid-game runs, no heat-resist gear | Sandstorms, occasional monster ambushes |
| Wasteland Tower descent | Top of Wasteland Tower or Spectacle Rock | Paraglider control, awareness of snipers | Player wants a fast entry or to scout the maze first | Bokoblin snipers on the walls, gusty thermals |
By offering two entry styles, the level designers avoid forcing one solution on the player. A ground route is friendlier to new players, while the high route gives a fast player a way to read the maze before they enter. Both routes terminate at the same building, and the building does not care how the player got there.
Common failure modes and how the design forgives them
Even with a good plan, players will still make mistakes inside South Lomei Labyrinth. The reason the dungeon feels fair is that each common failure has a soft recovery, not a hard punishment.
- Stamina miscalculation on a climb usually leaves the player in a courtyard with monsters, not in instant death. Recovery is combat or retreat.
- Getting lost in the corridors is solved by climbing a wall or by mapping the maze from above, both of which the game has already taught the player.
- Landing in the wrong interior courtyard after a glide is rarely fatal. The player can rotate through a side corridor or climb back out.
- Running out of weapons is mitigated by the loot curve. The maze is full of weapons, and the player learns to use them on the way in.
This forgiving failure pattern is part of the design vocabulary of the entire game. It is also a good benchmark for developers who are tempted to design punitive dungeons. The punishment should always be a delay and a lesson, not a reload.
Why this design pattern travels well to other projects
South Lomei Labyrinth is a useful template for any developer who wants to design a large indoor space in an open world. The same recipe translates to a stealth mansion, a flooded ruin, a science station, or a crashed ship. The four ingredients are the same in every case.
- A clear outer shape that the player can read from a distance before they enter.
- Traversal systems that let the player move through the space in at least two distinct styles.
- An enemy layer that paces itself across the three-act structure of the dungeon.
- A reward layer that gives the player multiple reasons to finish, including a quest hook and a final chamber.
None of these ideas are new. What Breath of the Wild demonstrates is how well they compose when every system on the page is talking to every other system. The maze is not a separate game. It is a density change in the same game the player has been playing for thirty hours.
Applying the same pattern in your own project
If you are building a large interior space in your own project, the South Lomei case study suggests a few concrete checks. These checks work in Unreal Engine, Unity, Godot, or a custom engine, because they are level design questions rather than engine questions.
- Can the player see the entire structure from at least one vantage point before entry? If not, the dungeon will read as confusing rather than challenging.
- Is the cost of climbing, gliding, or running tuned to the same stamina, energy, or cooldown budget as the rest of the game? A maze that breaks the budget feels broken even if it is technically correct.
- Are enemies placed in a curve that escalates with position, rather than evenly distributed?
- Is the reward density inside the maze comparable to the reward density outside it? A dungeon that pays worse than the world around it will feel like work.
- Does the final chamber offer a payoff that the player can talk about? A shrine, a vista, a cutscene, a single unusual item. Anything that gives the run a story.
These checks are simple, but they are exactly the ones the developers at Nintendo EPD answered when they built South Lomei Labyrinth. They are the reason the maze still holds up as a piece of level design years after the game shipped.
What the design teaches about scale and density
One of the deeper lessons in the labyrinth is about density. A large empty maze is tedious. A small crowded maze is oppressive. South Lomei Labyrinth sits in the middle, with corridors that breathe, camps that pace themselves, and a final chamber that compresses the player back into a tight space. The designers manage density the way a sound engineer manages volume: not by raising the level, but by varying it.
For developers, that idea generalizes. The density of combat, of loot, of landmarks, of light, and of sound all matter. Players do not experience each system in isolation. They experience the sum. A well-tuned dungeon is one in which the sum is greater than the parts, and the player leaves the maze feeling that they have been through something specific rather than something long.
Reading the design in context with the rest of the world
South Lomei Labyrinth is most interesting when you read it as a level in a larger open world rather than as a standalone puzzle. The same Breath of the Wild design vocabulary shows up in shrines, in Divine Beasts, in the Depths, and in town layouts. The maze is one variation on a theme the developers kept returning to throughout the game, and that repetition is part of why the world feels coherent.
If you are studying the game for a portfolio piece, it is worth comparing this labyrinth with a smaller dungeon, a shrine, and a town square. Notice how the design vocabulary stays the same and only the density changes. That is the move you want to copy: a small set of verbs, applied across a wide range of spaces, with the cost and reward carefully balanced in each.
Quick checklist before you enter the labyrinth
The first time you walk up to the entrance, it helps to run a short checklist. Most of these items are level design decisions the developers built into the world, but they are also good habits for any large interior in any game.
- Scan the structure from a ridge or a tower before entering.
- Cook or stock a few meals with heat resistance if you do not have desert armor.
- Pick weapons with enough durability to cover a long dungeon run.
- Decide if you are going in to clear the maze, to find a specific chest, or to trigger the shrine quest.
- Note the time of day in the game, since lighting affects how easy the corridors are to read.
- Plan one or two exit routes in case you need to reset stamina or heal.
None of these steps are required, but each one removes a small source of friction. That is exactly what good level design is supposed to do. The game keeps the challenge, the player keeps the choice, and the maze rewards both with a clean, satisfying exploration.
Frequently asked questions
Where is South Lomei Labyrinth in Breath of the Wild?
South Lomei Labyrinth sits in the eastern portion of the Gerudo Desert, between Mount Granajh and the East Barrens, at the foot of Daval Peak. It is one of three Lomei structures in the game, and it is the southern counterpart to the North Lomei Labyrinth in the Hebra region.
What shrine does South Lomei Labyrinth reveal?
The labyrinth reveals Dila Maag Shrine, which is unlocked through the shrine quest that begins when the player enters the maze. The shrine itself contains a puzzle that the player solves inside the labyrinth’s central chamber.
What is the easiest route to South Lomei Labyrinth?
The most common route is the ground path through Champion’s Gate, located next to the East Barrens and north of Keive Tala Shrine. Players can also descend from the Wasteland Tower or Spectacle Rock, though the IGN guide warns that Bokoblin snipers patrol the high walls along that route.
Do you need heat protection for South Lomei Labyrinth?
Heat protection is helpful for the approach through the Gerudo Desert, especially during the in-game midday hours. The interior of the labyrinth is cool, so heat becomes a concern mainly on the way in and on the way out.
How many chests are inside South Lomei Labyrinth?
The maze contains a fixed set of chests scattered through the outer ring, the mid-maze, the inner ring, and the final chamber. Loot ranges from gems and weapons to armor pieces, and the most distinctive chest is usually the one in the central reward room.
Is South Lomei Labyrinth required to finish the game?
The labyrinth is optional content. It is not required to complete any of the main story beats, but it is a useful source of spirit orbs, weapons, and armor, and it teaches traversal skills that show up in later dungeons and in the Depths.
How does South Lomei Labyrinth compare to North Lomei Labyrinth?
Both labyrinths share the same geometry and the same shrine quest structure, but North Lomei Labyrinth is set in the cold Hebra region, so cold resistance and warm clothing matter more. South Lomei Labyrinth focuses more on heat, stamina, and desert enemy types.
Can you solve South Lomei Labyrinth by climbing over the walls?
Yes, the player can climb over many of the outer walls, which is one of the most efficient ways to reach the central chamber. The catch is that the interior walls are sometimes too tall to climb in one stamina bar, and weather conditions can make climbing slippery.
What level of hearts or stamina is recommended for this labyrinth?
There is no hard requirement, and the labyrinth is tuned to be approachable in the mid-game. A player with at least a few hearts upgraded, a couple of stamina wheels, and a small stock of meals will find the run comfortable rather than punishing.
Why is South Lomei Labyrinth a useful design reference?
It is a clean example of a system-driven dungeon in an open world. The maze uses the same traversal, combat, and stamina rules as the rest of the game, which is why it still feels coherent years after launch and why level designers keep coming back to it as a case study.


Leave a Reply