
Muddy Murder location in FF16: where to find the Flan Prince in Rosaria
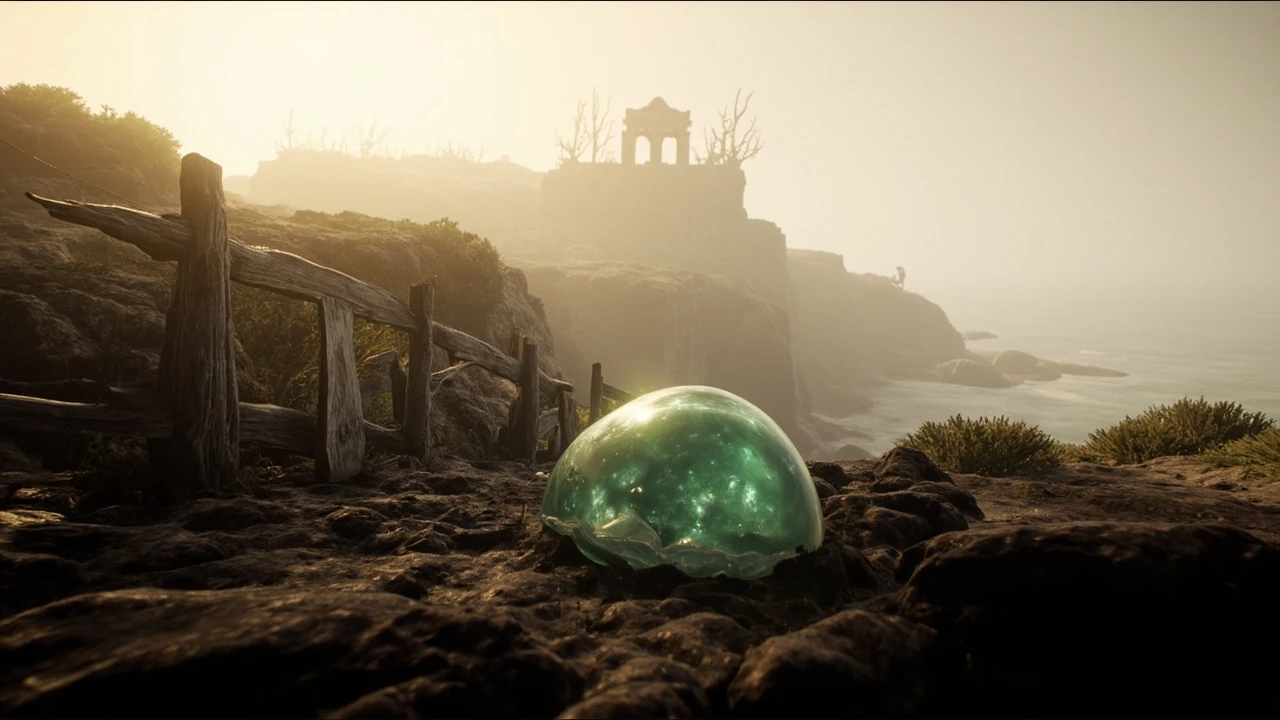
The muddy murder location in FF16 is a stretch of clifftop meadow in the southern part of Rosaria, sitting on terrain the in-game map labels Hawk’s Cry Cliff. The mark only appears once the A-Rank tab of the Hunt Board has been populated, which happens partway through the Bolts from the Blue main quest, so players who reach the southern roads and see nothing are usually just a story beat away from the unlock. Muddy Murder also goes by two other names in the flavor text and the Hunt Board itself: Muddy Water and the Flan Prince, both of which refer to the same gelatinous A-Rank Notorious Mark. Because the fight takes place in the open field rather than inside a cave or a separate arena, the location itself is part of the challenge. Walking into the trampled circle starts the encounter immediately, and the surrounding biome is shared with smaller flan enemies that can join in if pulled during the approach.
This walkthrough focuses on the practical side of the hunt: how the A-Rank unlock chain interacts with the main story, what level and gear the encounter assumes, how the Flan Prince’s moveset breaks down into named telegraphs, and what changes once the boss enters its Dualcast phase. The information is written for a player working through the second major region of Final Fantasy XVI and pairs naturally with broader hunt-board and progression guides that Morvexa Games maintains for action RPGs.
How Muddy Murder unlocks on the A-Rank Hunt Board
Muddy Murder is not on the Hunt Board from the opening of the game. It is filed under the A-Rank Notorious Mark tier, which means the player has to clear the introductory hunts first and meet a story requirement before the entry even appears. The relevant unlock window opens during Bolts from the Blue, a main quest in which Clive and his companions investigate reports of imperial magitek operating in Rosaria. That quest pushes the story through the southern half of the region, and once the player is free to roam Rosaria again, the A-Rank tab fills in with several marks, including Muddy Water. The level listed for the mark is 38, which is roughly where the player sits by the end of the questline that triggers the unlock, so the level and the quest flag usually line up.
For most players, the practical unlock sequence looks like this:
- Reach Rosaria as part of the main story and unlock the region’s basic Hunt Board at the local Hideaway.
- Clear the introductory B-Rank hunts around the central mining ridges and the Lostwing farmlands so the A-Rank tab starts to populate.
- Progress through Bolts from the Blue until the story releases you back into free roam.
- Visit any Hideaway Hunt Board notice and switch to the A-Rank tab; Muddy Murder will be listed.
- Accept the mark from the board; the world map updates the destination marker to the muddy murder location in FF16.
Because the mark is tied to a specific main quest beat rather than a side activity, a player who skips ahead with rest bonuses, or who is replaying the campaign in Final Fantasy Mode after the main story is finished, can find Muddy Murder on the board earlier than the first playthrough would suggest. The quest flag, not the character’s level, is the real trigger, and the level is just the suggested danger rating that the board displays next to the mark’s name. A few side activities in the same stretch of Rosaria, including a nearby procurer’s errands, also light up around the same quest beat, which can make the A-Rank tab feel like it fills in all at once.
Where to find Muddy Murder on the world map
The map marker for Muddy Murder sits in the southern portion of Rosaria, on the clifftop terrain that overlooks the sea. Rosaria’s geography is fairly readable from the map screen: the central fast-travel outpost at the Hideaway, the northern farmlands around the Lostwing area, the central mining ridges, and the southern cliffs that drop toward the water. The muddy murder location in FF16 is in the southern segment, in a meadow a short walk from the closest road bend. Players coming from the central Hideaway usually travel south past the mining ridges, hang a right at the ruined watchtower, and continue along the clifftop road until the grass opens up into a wide, flat stretch with a circle of trampled ground at its center.
Several landmarks help confirm that the player is in the right place:
- A crumbling wooden fence that runs along the clifftop edge, used as a reference point for earlier hunts in the same biome.
- A small ruined watchtower whose base serves as the respawn anchor for nearby minor enemies and whose silhouette is visible from the road.
- A wide, flat stretch of tall grass that opens into a circle of trampled ground where Muddy Murder spawns.
- A clear view of the southern sea from the cliff edge, which is a useful visual landmark for any subsequent revisits.
Because the encounter is a field mark rather than a dungeon, there is no door, no loading screen, and no instanced arena. Walking into the trampled circle starts the fight immediately. Players who do not want to be ambushed should approach from upwind, since the area is also populated by standard flan enemies that can join the fight if pulled. The encounter is also positioned near the cliff edge, which is not a hazard by default but does limit the safe retreat space if the player is forced to disengage. A short loop behind the ruined watchtower is the cleanest disengage path when a pull goes wrong, and it doubles as a place to bait the Flan Prince into a tighter opening engagement rather than letting it anchor near the cliff.
Recommended level, gear, and ability loadout
Muddy Murder is a level 38 fight, which puts it roughly in the middle of the Rosaria power curve. The mark assumes the player has access to a mid-tier weapon, several Eikon abilities, and a stockpile of healing items. Going in under-leveled is possible if the player has strong timing, but the Flan Prince’s area-of-effect damage scales sharply with difficulty, so a soft level cap of around 35 is a sensible minimum. Players who are running the encounter on Hard mode from the start should treat the suggested level as a hard requirement rather than a guideline, because Hard mode increases the rate at which the boss enters its Dualcast phase and trims the recovery windows that a Normal-mode player can lean on.
Useful pieces of preparation include:
- At least one full bar of healing items, including one high-tier potion reserved for the Dualcast phase.
- Access to a ranged ability that can punish telegraphs from a safe distance during the spell rotation.
- A blocking or parry tool for the physical arm attacks, which have unusually long reach and are easy to underestimate.
- Will gauge and a populated stagger meter plan for the post-Dualcast window, since the Flan Prince is weak to elemental stagger.
Players who enjoy the defensive toolkit that Titan brings into the kit can lean on Titan Block to absorb the Flan Prince’s long-range arm strikes. Players who prefer aggressive play usually combine a fast sword with a precision ability such as Phoenix Shift, which lets them close distance during a cast and land a small combo before the next spell lands. The exact weapon does not matter as much as the elemental spread on the ability bar, because the fight is gated more by stagger than by raw damage output. A common mistake is to bring three abilities of the same element because they happen to be the strongest single hits; that build gives up the stagger path that the encounter is actually balanced around, and the player ends up fighting a much longer version of the mark.
Reading the Flan Prince’s moveset
The Flan Prince is unusual among Rosaria’s Notorious Marks because it is a hybrid elemental and physical fighter. The IGN guide for the Muddy Murder hunt lists Blizzaga, Stonega, Firaga, Tornado, and Thundaga as the spell rotation, alongside a long-range physical arm strike that uses the flan’s elastic limbs rather than a melee weapon. Because every major ability is named and telegraphed with a glowing ground indicator, the fight rewards players who learn the cadence of the cast bar rather than trying to brute-force the mark with raw damage. The telegraphs also do not all share the same shape: some are ground-targeted circles, some are frontal cones, and some are tracking AoEs that follow the player, so the dodge vocabulary has to be wider than the one used against the earlier B-Rank marks in the same biome.
The elemental and physical toolkit breaks down roughly as follows:
- Blizzaga and Stonega are ground-targeted AoE spells that can be sidestepped with repeated lateral evades once the telegraph appears on the floor.
- Firaga is a frontal cone that can be cancelled or reduced with Clive’s Heatwave ability, turning the spell into a punishable window.
- Tornado is a tracking AoE that follows the player, so flat-out sprinting is safer than dodging once the indicator is on the ground.
- Thundaga is a fast vertical strike that punishes players who panic-roll, rewarding instead a single well-timed side step.
- The arm strikes stretch well beyond the flan’s body, so trying to stay just outside melee range is not safe; the player has to commit to either in or out.
Once the Flan Prince drops below roughly half health, it unlocks Dualcast, which lets it fire any two of the named spells at the same time. The combination chosen by the encounter is not fixed, but every combination is built from the same five spells, so the dodge vocabulary does not need to expand. The new requirement is spacing: the player has to position so that the two telegraphs do not overlap, which is usually only possible by breaking line of sight around a piece of the cliff terrain. The encounter also tends to use the same pair twice in a row if the first one lands cleanly, which is a useful tell for players who pay attention to the cast bar between attempts.
How to handle the Dualcast phase
Dualcast is the moment where most unprepared parties lose the muddy murder location in FF16 fight. Two simultaneous AoE telegraphs compress the usual safe windows, and the second cast lands while the player is still recovering from the first. The fight becomes a navigation problem more than a damage problem, and the players who struggle the most are usually the ones who try to keep the same combo rhythm they used in the first half of the encounter. The five spell names do not change, but the timing window between them shrinks to almost nothing, and a single mistimed dodge is punished by the second spell landing on top of the recovery frames.
Three habits help a lot during this phase:
- Stop chasing combos. After Dualcast ends there is a short recovery window, but committing to a long string before the cast finishes usually means being caught in the second spell.
- Use terrain. The trampled ground around the spawn circle includes a slight rise and a pair of ruined fence posts. Standing on or behind either feature can break the line of one of the two telegraphs, leaving only one spell to dodge.
- Reserve a high-tier potion for the moment a dual spell lands. The heal should be a reaction, not a rotation step, because the chance of taking chip damage during this phase is high even with clean dodges.
Players who have unlocked the Cold Snap or Lightning Rod abilities can use the elemental weakness window to stagger the Flan Prince out of Dualcast early, but this is a comfort tool rather than a requirement. A well-timed Titan Block on the arm strike can also stagger the boss, opening a long punish window even during Dualcast. The key is to make a habit of treating each Dualcast as its own short encounter rather than as a continuation of the main fight, because the dodge timings and the safe positions are different from the pre-Dualcast phase. Players who have done other A-Rank hunts in the same biome often try to lean on the same muscle memory that worked there; for Muddy Murder, that reflex usually costs a potion, because the spell list and the cast cadence are different from anything the player has seen up to that point.
Stagger plan and damage windows
The Flan Prince’s stagger gauge fills fastest from elemental damage, which is unusual for an A-Rank mark and shapes how the player should build their combo strings. The encounter rewards players who bring at least one ability of each element, so that they can keep the stagger bar rising through both the spell phase and the Dualcast phase. This is the part of the fight that the official Muddy Murder guide emphasizes: the encounter is built around the five spell telegraphs, and the stagger path is the most reliable way to skip large portions of the rotation. Players who ignore the elemental spread on their ability bar and rely only on weapon damage will see the stagger bar barely move, and the fight will drag on into multiple Dualcast windows.
| Phase | Main threat | Best response | Damage window |
|---|---|---|---|
| Opening | Ranged Blizzaga and Stonega circles | Repeated lateral evades, then punish with two melee hits | After the second named spell resolves |
| Mid fight | Firaga frontal cone, Tornado tracking AoE, Thundaga vertical strike | Cancel Firaga with Heatwave, sprint out of Tornado, single side step on Thundaga | Between each named cast |
| Arm strike | Long-range elastic physical swing | Sidestep rather than block, then commit to a long sword combo | During the recovery frames after the swing |
| Dualcast | Two simultaneous telegraphs from the same spell list | Use terrain to break one line, reserve potion as a reaction | After Dualcast ends, before the next single cast |
| Stagger | Posture break after sustained elemental damage | Unload the highest-damage ability, ideally an Eikon ability | Full punish window until the boss recovers |
Once the stagger window opens, the Flan Prince’s posture breaks and the standard punish chain from earlier hunts applies. Two full Eikon abilities in a row are usually enough to drop the mark from low health into the victory animation, especially on Normal mode. On Hard mode the punish window is shorter, so it helps to have one Eikon ability pre-charged in the background so the first ability can be fired immediately when the stagger triggers, with the second ability used to extend the punish chain into the recovery frames. The numbers do not change between Normal and Hard, only the windows do, so a player who clears the mark on Normal will not see new moves in the Hard rotation, but will see less room to make a mistake inside the same moves.
Rewards and why the mark is worth the trip
A-Rank marks in Rosaria are tuned to drop crafting materials, rare accessories, and significant amounts of renown. Muddy Murder is on the generous end of the A-Rank curve, which is part of why so many players search for the muddy murder location in FF16 even when they have already out-leveled the encounter. The reward table is the same on Normal and Hard modes, but Final Fantasy Mode scales the experience and the chance of rare drops upward. The mark also counts toward several hunt-related trophies and achievements, which is useful for completionist runs that track A-Rank completion percentages across the region.
Common reward categories include:
- A high-rarity crafting reagent used in mid-game weapon upgrades, which is a bottleneck for several early-to-mid weapon paths.
- An accessory that boosts elemental damage, which feeds into several late-game builds and is the reward most players cite as the reason to do the hunt early.
- A chunk of renown that pushes the player toward the next region unlock and contributes to the broader Rosaria completion checklist.
- Achievement and trophy progress tied to A-Rank completion counts, which is meaningful for players running a trophy sweep.
For players who are running a Rosaria-focused elemental build, the accessory in particular is the reward that justifies the detour. For everyone else, the renown and achievement progress are usually enough to put Muddy Murder on the route when passing through the southern cliffs. The encounter also has a relatively short travel time from the central Hideaway, which keeps the cost of repeating it for drops reasonable. The crafting reagent in particular is the bottleneck that holds back several early-to-mid weapon paths, and farming Muddy Murder is one of the faster ways to clear that bottleneck before moving into the next region, where those weapon paths open up into much larger upgrade trees.
Common mistakes when hunting Muddy Murder
Even with the right map marker, the muddy murder location in FF16 still punishes several habits that are safe against other marks. The most common mistakes fall into the same few categories, and they are the reason a fight that the official guide treats as mid-tier ends up taking three or four times longer than expected for unprepared parties. A quick scan of the list below is often enough to cut a run’s time in half, because the fixes are mostly small adjustments to timing and ability selection rather than wholesale strategy changes.
First, players often try to brute-force the encounter with raw damage and ignore the elemental stagger path. The Flan Prince is one of the few A-Rank marks where elemental damage is more efficient than raw weapon damage, so an ability loadout that ignores the five spell elements drags the fight out and exposes the player to more Dualcast windows. The stagger bar barely moves under pure sword pressure, which means the boss stays in its aggressive rotation for longer. Second, players treat Tornado as a dodge-friendly AoE and try to roll out of it. Because Tornado tracks the player, rolling usually keeps the player inside the indicator. Sprinting or using a movement ability such as Phoenix Shift is more reliable, and the dodge i-frames do not cover the full duration of the tracking AoE. Third, players assume the long arm strike is a melee-range move and stand just outside what looks like sword range. The arms extend well past the visible flan body, so a player who stays at sword range will eat the strike and lose the punish window that should follow. The correct read is either to commit fully into melee range and use the recovery frames, or to back off to a distance where the arm cannot reach at all, which is further than it looks.
Fourth, players who are searching the wrong half of Rosaria give up before they find the clifftop. The southern meadows are easy to confuse with the central mining ridges on the world map, especially at night, so a quick sanity check against the landmarks listed earlier in this guide saves a lot of time. If the player is looking at a screen full of stone and ore rather than grass and fence posts, they are in the wrong biome. Fifth, players enter the trampled circle with low healing stock and no high-tier potion reserved for the Dualcast phase. A single unmitigated dual spell can drop a mid-level character in one hit, and the heal is the difference between a clean clear and a wasted attempt that still counts against the hunt quota. Sixth, players run the mark on Hard mode before they have a clean Normal clear to compare timings against; without that reference, the trimmed Dualcast windows feel like a damage problem when they are really a timing problem, and players tend to over-level rather than fix the timing.
How Muddy Murder fits into a Rosaria completion route
For players who want a clean route through Rosaria, Muddy Murder sits naturally in the second cluster of A-Rank marks, after the central mining ridges have been cleared and before the player moves north toward the next region. The hunt-board layout means that several marks share a clifftop biome, and chaining them in one sweep is faster than running back and forth from the Hideaway. The route is also a good fit for a level 35 to 40 character because the marks in the southern cliffs are tuned around the same power band as Muddy Murder.
| Route step | Location | Mark tier | Notes for the sweep |
|---|---|---|---|
| 1 | Central Rosaria Hideaway | Pickup | Grab the full A-Rank tab from the board before leaving |
| 2 | Mining ridges | B-Rank | Warm up the rotation on lower-tier marks first |
| 3 | Lostwing farmlands | Mixed B and A | Pick up the northern A-Rank marks on the way south |
| 4 | Hawk’s Cry Cliff | A-Rank (Muddy Murder) | Final stop on the southern clifftop, level 38 fight |
| 5 | Return to Hideaway | Turn-in | Submit the full batch at once for the renown payout |
This route also feeds nicely into broader Rosaria completion checklists because it covers most of the region’s Notorious Marks in one loop, and it leaves the player at the cliff edge with a clear view of the southern sea, which is a convenient visual landmark for any subsequent revisits. Players who are tracking trophy progress can also use the route to knock out the A-Rank completion milestone for Rosaria in a single sweep, which is faster than running each mark as a separate trip. The same route doubles as a farming loop once the mark is on cooldown, because the trampled circle and the cliff terrain are the fastest spot in the biome to reset and re-enter, and the standard flan enemies along the way drop a small amount of incidental crafting material that softens the cost of the run.
Frequently asked questions
What is the muddy murder location in FF16 exactly?
The muddy murder location in FF16 is a clifftop meadow in the southern portion of Rosaria, in an area the map labels Hawk’s Cry Cliff. The mark is a level 38 A-Rank Notorious Mark called Muddy Murder, also known as the Flan Prince, and it spawns in the open field rather than in a dungeon or a separate arena.
What level should I be for Muddy Murder?
The encounter is tuned for level 38, but most players can clear it comfortably from level 35 onward as long as they have a full healing kit, an elemental ability or two, and a good read on the AoE telegraphs. Going in under level 33 is risky because the late-fight Dualcast phase scales sharply with difficulty, and Hard mode in particular punishes under-leveled players heavily.
How do I unlock the Muddy Murder hunt?
Muddy Murder appears on the A-Rank tab of the Hunt Board once the player has progressed through the Bolts from the Blue main quest. The trigger is the quest, not the player’s level, so a replay on Final Fantasy Mode can unlock the mark earlier than a first playthrough would.
What is the Flan Prince’s weakness?
The Flan Prince takes increased stagger from elemental damage, which is unusual for an A-Rank mark. Bringing at least one ability of each element lets the player push the stagger bar higher between casts and shorten the dangerous Dualcast phase.
How do I dodge Dualcast without taking damage?
Position so the two AoE indicators do not overlap, then use the cliff terrain or ruined fence posts to block one of them. The second telegraph can usually be sidestepped with a single lateral evade, and a high-tier potion should be reserved as a reaction rather than a rotation step.
Is Muddy Murder the same as Muddy Water?
Yes. Muddy Murder, Muddy Water, and the Flan Prince are three names for the same A-Rank Notorious Mark. The Hunt Board lists the encounter as Muddy Murder, but the flavor text and several in-game references call it the Flan Prince or Muddy Water.
What rewards does Muddy Murder drop?
The reward table includes a high-rarity crafting reagent, an elemental damage accessory, a chunk of renown, and progress toward hunt-related trophies. On Final Fantasy Mode the experience and rare drop chance scale upward, which is part of why replaying the fight is a common step for completionist runs.
Can I co-op Muddy Murder?
FF16 does not support co-op for main story or hunt content, so Muddy Murder is a solo fight. The encounter is balanced around a single player, and the reward table does not change with the number of participants because the number is always one.
Where does the muddy murder location in FF16 fit into the broader Rosaria route?
The mark sits in the second cluster of A-Rank hunts in Rosaria, after the mining ridges and before the player pushes north toward the next region. Most players chain it with two or three other A-Rank marks in one sweep through the southern cliffs.
Why do some guides call the fight easier than it feels?
Most difficulty complaints come from players who try to brute-force the fight with raw weapon damage instead of using the elemental stagger path. Once the rotation is built around the five spell telegraphs, the fight becomes a navigation problem rather than a damage problem and feels much more manageable.

Leave a Reply